Not only will you need to print out your college essay or school assignment, but it’s crucial to include a bibliography as well. The simplest way to do this is to enter your sources and have Microsoft Word automatically generate a bibliography based on the writing style you choose.
Here, we’ll step through adding citations, organizing sources, and how to generate a bibliography in Word and update it when needed.
Add a new citation in Microsoft Word
You’ll need the fundamental information for the source, whether it’s a book, article, website, or another source, to add a new citation in Word. So, make sure the information is close to hand before following these instructions.
Step 1: Go to the Citations & Bibliography section of the ribbon’s Citations tab.
Step 2: Choose your writing style from the Style drop-down menu, which by default probably shows APA. The list includes the most popular forms, including MLA, Chicago, and others.
Step 3: Select Place the citation in the same ribbon section and choose. new source added
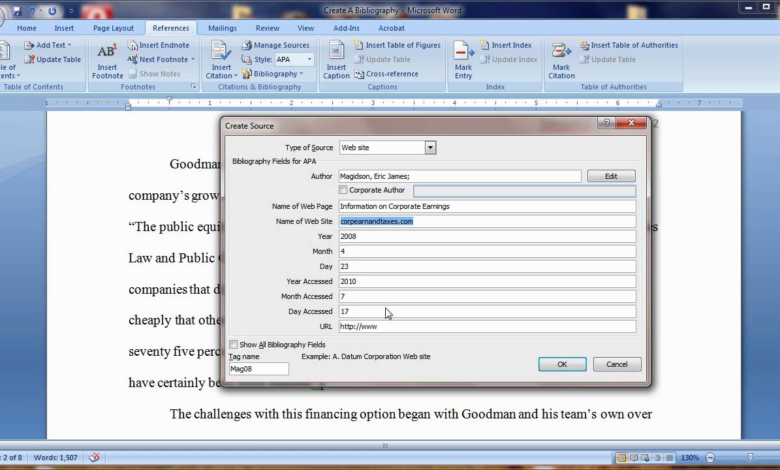
The fields below will update to reflect the source type after you select it in the Type of source drop-down box.
Step 4: Provide all the information required by your source. If the fields you desire don’t appear, you can optionally tick the box for Display all bibliographical fields.
Step 5: After you’re done, click OK to save the source, and the source will be added to your content in the chosen format.
Manage your sources in Word
You can update or reuse a source after adding it to your paper. Also, a master list that saves your sources enables you to use them in other Word documents.
Step 1: On the References tab, pick Manage sources in the Citations & bibliography portion of the ribbon.
Step 2: The Master list of sources is on the left when the box opens. You will also find it in this list if you added one using the section above.
- Choose the existing source, then click Copy in the center to include it into the current document. By doing this, it is added to the Current list where it may be quickly included into the current document (explained below).
- Choose the source you want to change, then click Edit. Make your adjustments after that, then select OK to preserve them.
- Choose the New button, fill out the form, and then click OK to add a new source.
Step 3: When you finish with the Source Manager, select Close.
You can rapidly add an in-text citation for sources that are currently listed in the Source Manager. Choose the source from the drop-down list by selecting the Insert citation button on the References tab.
Create a bibliography in Word
Word uses the sources you’ve added to the Source Manager list automatically when you’re ready to insert a bibliography.
Step 1: Put your cursor where you want the bibliography to appear in the document, then select the References tab.
Step 2: Whether you’re writing in APA, MLA, or another style, make sure the formatting is proper in the Style drop-down box.
Step 3: Choose the Bibliography drop-down option in the Citations & bibliography section of the ribbon. You’ll notice a few built-in alternatives with various headlines that you can select from.
Choose Insert bibliography to create one without a heading if you’d like.
Step 4: Pick the option you want and it’ll pop into your document.
Update a bibliography in Word
Your bibliography is automatically generated by Word, so you can simply change it if necessary, much like when you add a table of contents. You could change a source’s information or add more citations.
Step 1: Choose Update citations and bibliography from the top left menu after selecting the bibliography.
Step 2: You’ll see the list of references update to include any additions or changes.
Without stressing over how to make a bibliography for your paper, college is difficult enough. I hope this guide puts you on the right track!
Have a look at how to double-space your work or add page numbers in Word now that you understand how to make a bibliography in Word.


